← All posts
How I rebuilt my personal website
Table of contents
Why rebuild?
Every few years, I have an itch to tear down my personal website — my home on the internet — and rebuild it using newer, improved tools. Every time I do this, my home gets a facelift, along with some cool features, and I learn something new along the way.
My first website, which I built during undergrad (circa 2013), was a static HTML page. It neither looked good nor was very functional. So, in grad school, I switched to Jekyll, which generates a static website from Markdown files. There were lots of templates to choose from, and Markdown meant better ergonomics for managing content. My website was conveniently hosted on GitHub Pages and served me well for many years.
But now it’s starting to look a bit stale. Managing content—like updating my list of publications—wasn’t as simple as editing a YAML file. And the website was still static. Adding interactivity—like giving readers different views of my research organized by year, topic, or venue at the press of a button—wasn’t easy. Lastly, I wanted a blog built into the website: the convenience of dropping Markdown files into my repo and having them neatly rendered as posts.
This time, my woes were answered by FastHTML—a minimal framework for building web apps in Python.
What is FastHTML?
The following Python script is FastHTML in a nutshell.
example.py
from fasthtml.common import *

app,rt = fast_app()

@rt('/')
def get():
    return Div(P('Hello World!'), hx_get="/change")

@rt('/change')
def get():
    return P('Nice to be here!')

serve()
When you run this with python -m example, it will serve your web app at http://localhost:5001 where you can see a webpage with Hello World! displayed. Clicking on this text will change it to Nice to be here!.
Basically, FastHTML provides all your HTML tags as Python objects called FastTags (e.g., Div, P in the example above correspond to <div> and <p> tags, respectively), and you can compose them programmatically to build your web app. FastHTML also provides convenient components like Card, Dropdown, Nav, etc. Interactivity can be achieved using either HTMX or JavaScript. For styling, you can use CSS libraries like PicoCSS or directly style any component with plain CSS. The FastHTML docs are easy to follow if you’re familiar with basic Python and HTML. Writing a FastHTML app feels like writing a FastAPI app—but returning HTML components instead of JSON.
Architecture and Building Blocks
Once I’d decided to rebuild the site with FastHTML, the next step was settling on a structure that would keep everything easy to maintain. I wanted updates to feel like “edit content, commit, done”—without having to touch rendering code every time.
At a high level, the pipeline looks like this:
data (projects.yaml, blogs/*.md etc) → app.py (FastHTML) → Render (deploy)
Content lives in YAML and Markdown (blog posts). The app.py script reads that data and uses FastHTML to generate the HTML returned by different endpoints. Finally, the whole app is deployed on Render.com. With that overview in mind, here are the building blocks that made this setup work well.
Separating Data from Rendering Logic
Essentially, I wanted to disentangle app logic from the data the app displays. All the data I edit or update frequently—like publications, co-authors, and updates—is stored as separate Markdown files. My app.py reads these files and creates the necessary HTML components.
This is especially convenient for rendering lists where each item shares the same structure but has different content. For example, each publication follows a two-column layout. The first column contains the title, with authors listed below. The second column contains metadata like venue, tags, and links. Once you’ve figured out how to render a single publication using FastTags (you can encapsulate this logic in a function that takes publication data as input and returns a component), you simply loop over all publications, create one component per publication, and add them to the page.
Here’s an example entry in my projects.yaml file that contains all project details:
projects.yaml
- title: "Visual Programming: Compositional visual reasoning without training"
  authors:
    - Tanmay Gupta
    - Aniruddha Kembhavi
  venue: CVPR
  year: 2023
  arxiv: https://arxiv.org/abs/2211.11559
  blog: https://blog.allenai.org/visual-programming-ca58c7af51cd
  code: https://github.com/allenai/visprog
  website: https://prior.allenai.org/projects/visprog
  tags:
    - Tool-use
    - Vision & Language
  highlight: True
  award: Best Paper @ CVPR 2023
Note that this is literally just the data—no application or rendering logic. The idea is to make it super easy to update this list of projects.
Styling with CSS and PicoCSS
I’m always amazed by what you can achieve visually by adding a bit of CSS to basic HTML. FastHTML lets you add inline CSS to any component using the style attribute, or apply global styling using a Style header. For example, to add a red border to a Div component, you can use:
Div("css styling example", style="border: 1px solid red;")
Or you can apply it to all Div components with a Style header:
Style("div { border: 1px solid red; }")
For components like cards, buttons, tables, etc., I largely relied on PicoCSS defaults and used custom CSS only when needed.
Flexible Layout with Flexbox Grid
For layout, I used Flexbox Grid, which provides simple classes to implement a grid layout with customizable columns. The following example demonstrates how to create a two-column row with a 4:8 split:
Div(
    Div("Column 1", cls="col-sm-4"),
    Div("Column 2", cls="col-sm-8"),
    cls="row"
)
Python for Multiple Views of Research
A cool addition to my new website is the ability for users to view my publications organized by highlights, year, venue, or tags. Here's what the tag view (showing publications grouped by tags or topic) looks like:
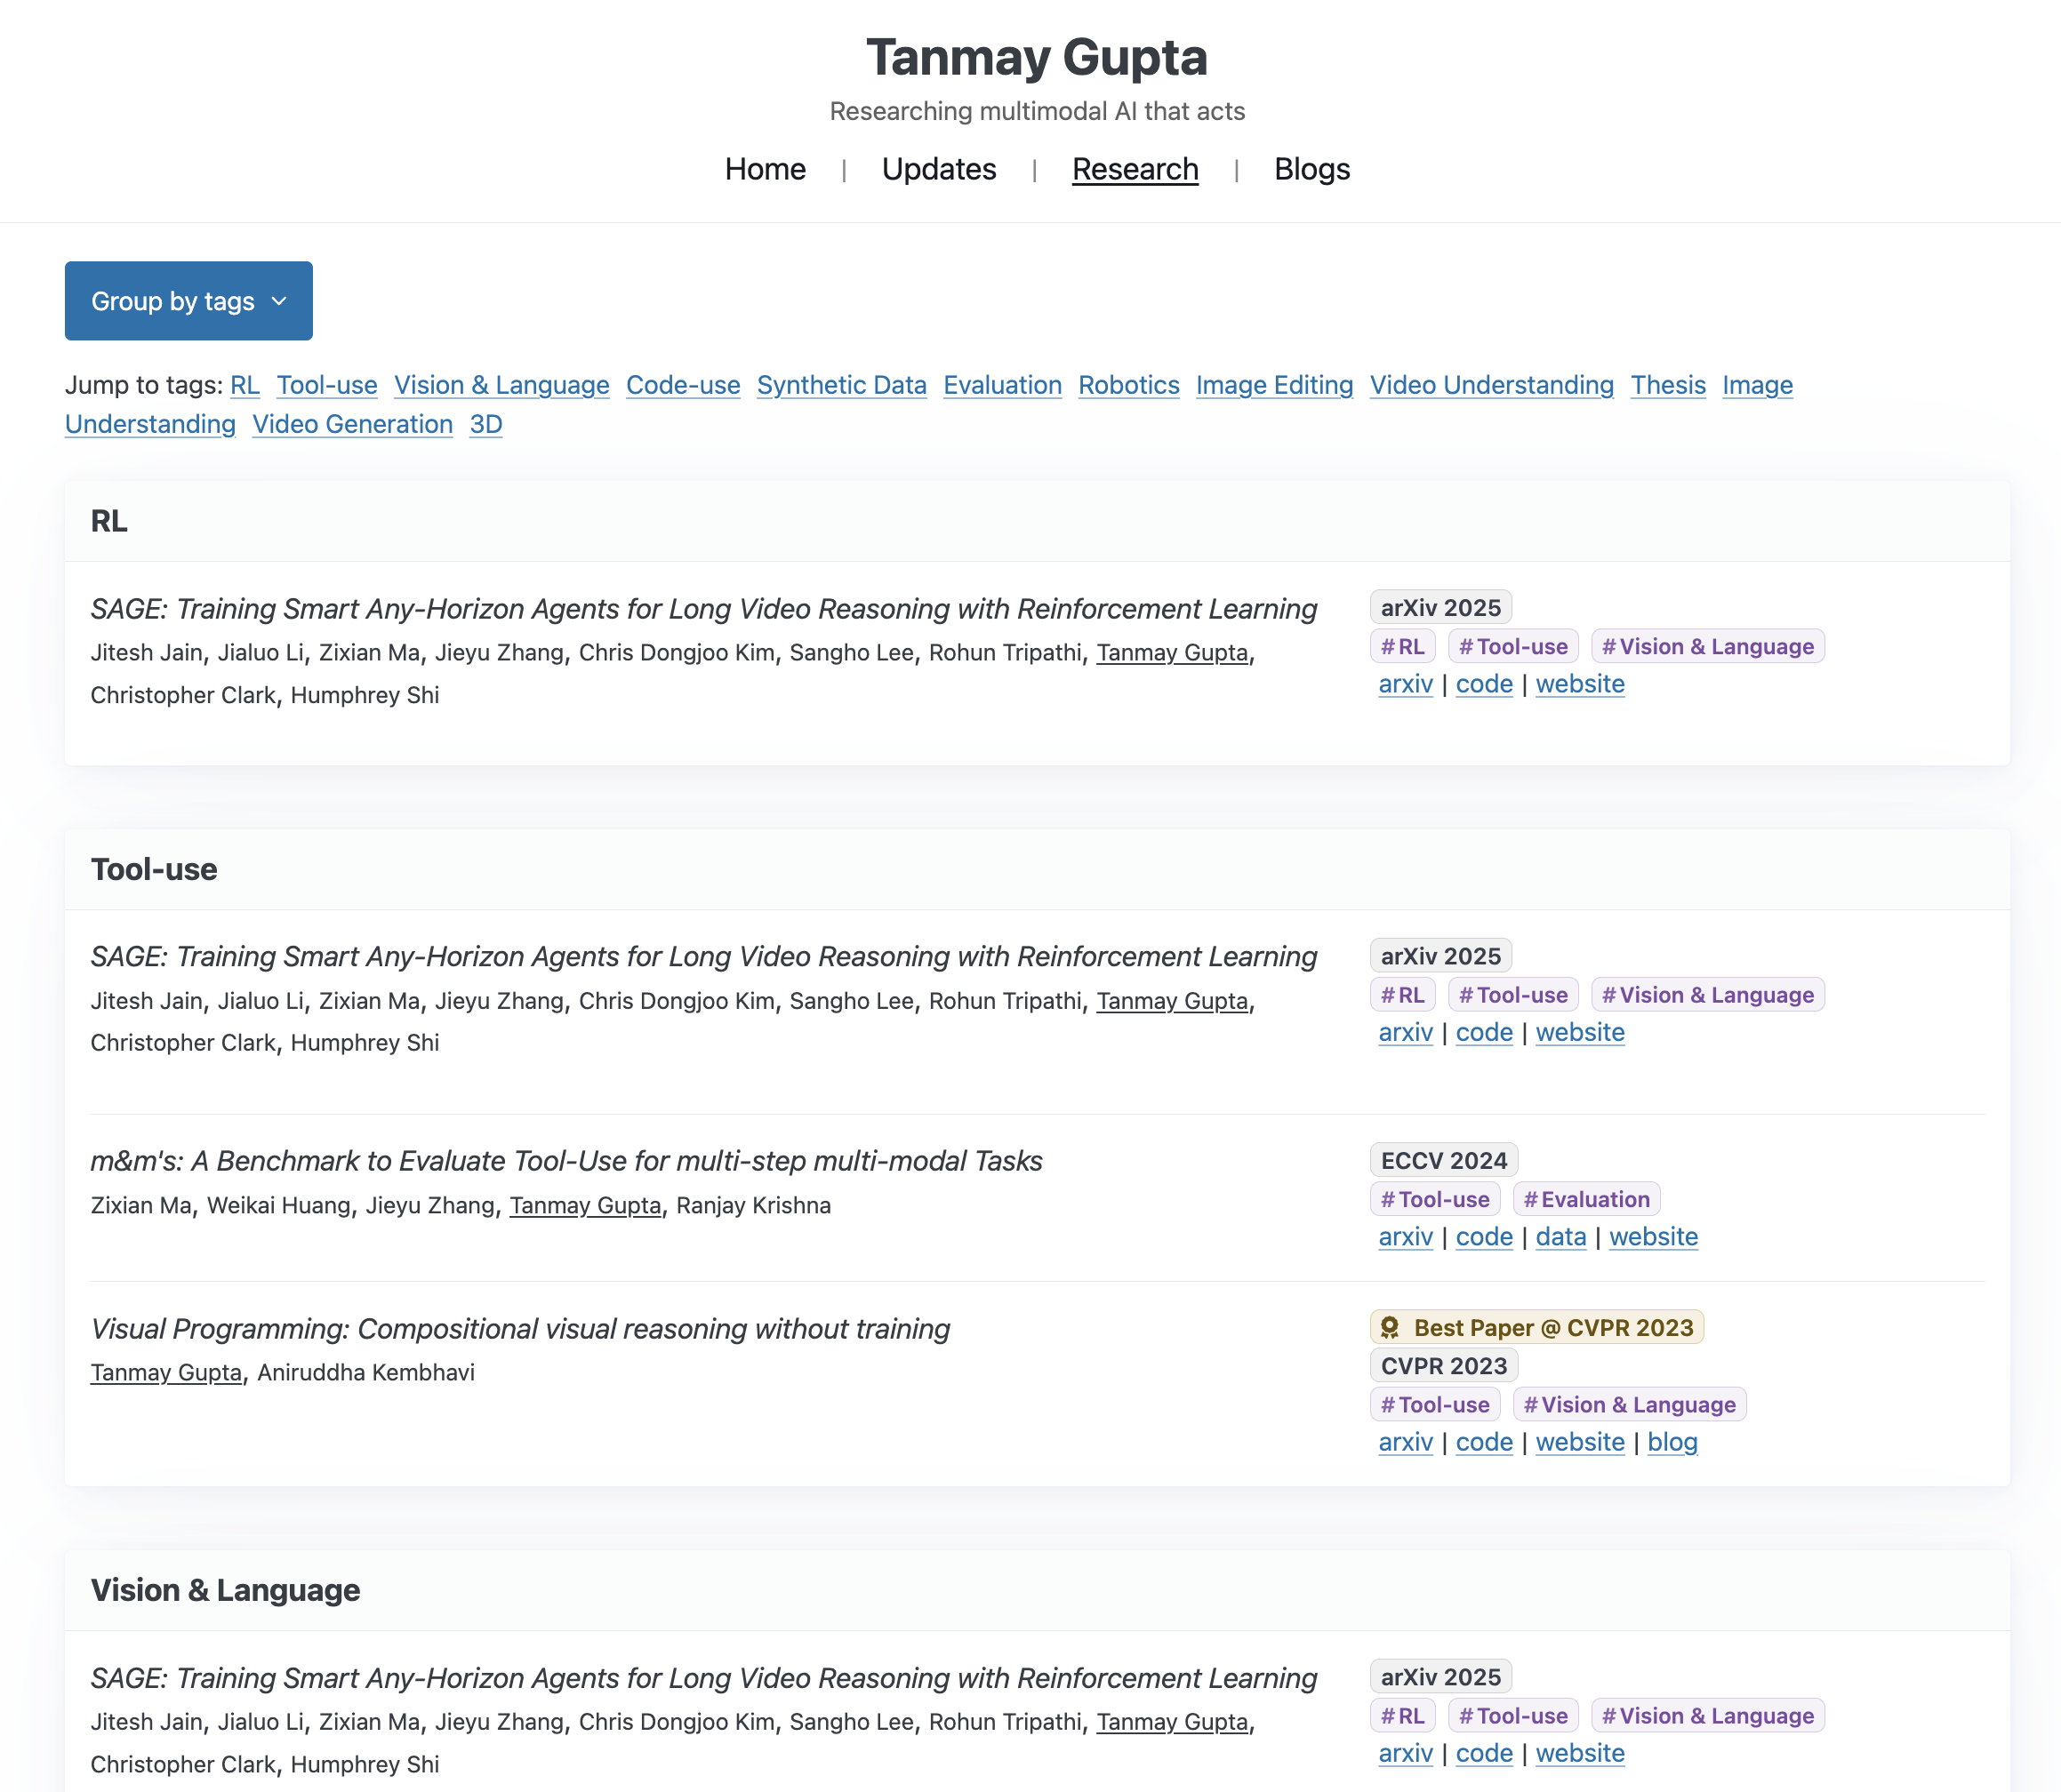
To implement this (see the code block below), I created a /research/{groupby} endpoint with a project_page function that accepts a groupby parameter. This parameter can be one of highlight, year, venue, or tag. list_projects is a Python function that groups the list of publications (read from a projects.yaml file) by the groupby parameter and returns a list of project groups. The rest of project_page is agnostic to the grouping logic and simply renders whatever list of groups it’s given.
@app.get("/research/{groupby}")
def project_page(groupby: str):
    groups = list_projects(group_by=groupby)
    ...
Finally, the dropdown items link to the respective endpoints.
dropdown = Div(
    Details(
        Summary(f"Group by {groupby}", role="button"),
        Ul(
            Li(A("Highlights only", href="/research/highlights")),
            Li(A("Group by year", href="/research/year")),
            Li(A("Group by tags", href="/research/tags")),
            Li(A("Group by venue", href="/research/venue")),
        ),
        cls="dropdown",
    )
)
Implementing a blog
In the past, I’ve used third-party blogging platforms like Jekyll, Medium, or Blogger/Blogspot. But surely it shouldn’t be too difficult to add Markdown files to my website repo and have them rendered as blog posts, right? Turns out it isn’t!
The app logic is straightforward. I keep all blog posts as Markdown files in a directory. To display the list of posts, the app reads the files and extracts metadata from the front matter. Here's an example:
---
title: "Markdown Tutorial: The Basics"
date: "2025-01-01"
description: "A practical guide to writing Markdown: headings, code, images, lists, and links."
publish: false
---
Only blog posts with publish: true are displayed; ones with publish: false are kept private as drafts. The date field is used to sort posts chronologically, and the title, date, and description fields are shown in the listing. The title also serves as a link. When a user clicks a title, the app loads the corresponding Markdown file and renders its content. The only missing piece of the puzzle is: how do you convert Markdown content to HTML? Conveniently, there’s a neat Python package called Python-Markdown for exactly this purpose!
import markdown as md
body_md = extract_markdown_content('your_markdown_file.md')
md_parser = md.Markdown(
    extensions=[
        "extra",  # tables, fenced code blocks, etc.
        "codehilite",  # code highlighting (CSS not included by default)
        "toc",  # generates TOC
    ],
    output_format="html",
)
html = md_parser.convert(body_md)
toc_html = md_parser.toc
rendered = Div(
    H2("Table of contents"),
    Div(NotStr(toc_html)),
    Div(NotStr(html)),
)
NotStr is a FastHTML wrapper that says the content is to be treated as HTML and not as a string.
Collaborating with a Coding Agent
I’ll admit it: on my own, I’m no HTML/CSS ninja. There are too many attributes to remember, and I can never recall how to set them all to achieve a particular look. Thankfully, the GPT-5.2 integration in my (Zed) editor’s Agents panel made me feel like Thor wielding an HTML/CSS hammer.
First, I implemented a v0 of the app with the core functionality. Then, I iteratively refined it with vibe-coding. I was worried the agent wouldn’t be good at a relatively new framework like FastHTML (a concern reflected in the FastHTML docs), but GPT-5.2 at least had no issues building on top of my v0 implementation.
I would describe, in plain English, how I wanted to modify the look and feel of a component, and the Agent would make the necessary changes. Sometimes I’d tweak the edits manually (or via further prompting), but very often I could simply accept them after testing the app locally.
As an aside, the key to successful iteration with a coding agent is giving clear instructions with the right context. Most editors let you conveniently add files, symbols, or selected code as context. In Zed, you can use @ and @symbol in the Agent’s panel to add file and symbol context, respectively.
I also had to import data from my old website, which stored publication data in a Markdown file that interleaved Markdown text and HTML tags. Porting this mess into a neat YAML file by hand would have been a chore. Instead, I added a few entries to my YAML file and asked the agent to complete it given the old Markdown source. The LLM hallucinated occasionally, but it was easier to fix a few sparse errors than to port all the data manually. (See the projects.yaml example above for what the YAML file looks like.)
Deploying with Render.com
Now we have a fully functional Python web app. But how do we deploy it? I had never deployed a Python web app before, so I did what anyone building in 2026 would do—ask ChatGPT. ChatGPT recommended Render.com as a straightforward option, and so it was.
Here are the steps to deploy your app on Render.com:
- Create an account on Render.com.
- Connect your GitHub repository to Render.
- Specify how to build your app: I use uv as my Python package and project manager, so I used:
uv sync --frozen && uv cache prune --ci - Specify how to run your app:
uv run app.py - Configure your DNS to point your custom domain at your Render app
- Deploy!
Final Thoughts
This was a fun weekend project that scratched two itches at once: it renovated my personal home on the internet, and I learned a little more about Python web development. God bless uv, FastHTML, and Render.com for making this project a breeze.
I also enjoyed building alongside a coding agent. For work, I use LLM integrations in my editor quite frequently (e.g., for auto-completions in a file, or in the chat panel to answer technical questions and solve bugs). But I typically avoid giving an agent edit access to critical codebases. This was a chance to let the agent loose on a codebase I’ll be maintaining for a few years. I’m happy to report that the agent didn’t wreak havoc, I didn’t lose my mind, and together we finished the project much much faster than I could have done alone.
Until its inevitable return in a few years, the itch to rebuild my personal website has been temporarily satisfied. This overzealous blog post is my subtle way of telling you exactly that.